Picture

Picture

Thursday, February 14, 2013

A Lot Of Valentine's Bling

For Kaylee and Abby's Sunday School classes and for the kids on the school bus I made these Valentine's Hershey Kiss rings. I bought some glittery pipe cleaners at the dollar store. And the Kisses were bundled up at the bulk foods store in bags for 99 cents and it was 20% off day. OK, sold! I wouldn't even want to guess the actual price of Hershey Kisses the week before Valentine's day so I lucked out there! Of course I was inspired by Pinterest and this is the post I followed for directions. These were my supplies: pipe cleaners, Kisses, and needle nosed pliers (you will thank me for this later).
Take 2 pipe cleaners and twist them together in the middle so that they are perpendicular.
Then place your Kiss bottom side down right in the center of your pipecleaners. I also removed the paper that was sticking out above the Kiss. It really just gets in the way.
Bring two of the sides up and give them and twist and then do the same for the other two sides. Try to keep them as close to the top of the Kiss as you can or your ring will stick up really high.
Then set the Kiss upright on top of one of your fingers or your thumb, depending on how big you want your ring size to be.
Wrap one side of your pipecleaners around your thumb and then wrap the tails around the bottom of your ring.

Wrap the other tails around the bottom of your ring also. This is where the pliers come in. Use them to tuck the sharp ends of the pipe cleaners in so that they don't cut/poke any little fingers. You don't need pliers to do this but your thumbs will get very sore if you do a lot of them "manually".

And a couple of shots with my models of course!


And the completed bling rings project!
I chose not to use the almond Kisses because there are so many children with nut allergies out there but the gold wrapped Kisses would have also made great bling rings if you knew they were safe for the children you were giving them to. And one other note, I didn't change rooms while working on my project, the carpet is the same carpet in all the pictures, I have no idea why it shows up as several different colors depending on which picture I took. Too funny.
Happy Valentine's Day all!
Shared at:
The Answer Is Chocolate linky party #92

Sunday, February 10, 2013

Happy Chinese New Year

When the Chinese United Church closed in our town, the last few members joined our Church. We usually sit in the row ahead of them and they have made very good friends with our little girls. Because Chinese New Year falls on a Sunday this year, we wanted to take them some cards. I used Fan's Cricket by Mo Manning for my image. I colored her using Prismacolor pencils and some glitter gel pens for her trim and on the cricket cage. The Happy New Year banner, lanterns and Chinese lattice corner pieces were all cut files from my Silhouette. I did go over the gold cardstock that backs the lanterns with a Martha Stewart glitter marker to add some shine. I also used a gold trimmed crochet cotton as the string for the lanterns. The little girls decorated the insides. I love how they turned out!
I would like to share my cards at:
Mo's Challenge Blog anything goes, closes Feb. 14,
Crafty Ann's tie a yellow ribbon, closes Feb. 14,
Moving Along With The Times only girls allowed, closes Feb. 14,
QKR Stampede someone special, closes Feb. 15,
Glitter n Sparkle Challenge girls are made of, closes Feb. 17 ***Winner!***

Saturday, January 26, 2013

A Valentine Birthday

My sister-in-law's birthday is February 10th. I chose a freebie image by Sylvia Zet from Wee Stamps that works for a birthday that is close to Valentine's day. I loved that it had two little birds that could be my 2 little ones. I just had to add eyelashes to the one little bird because my daughters felt that was what made them girl birds, ah kids. I outlined the image with my Zig markers. The sentiment and stitching were added in my Silhouette program and then printed on white cardstock. However I also went over the sentiment with my black marker too.

I would like to share my card at:
CAS-ual Fridays use markers, closes Jan. 31,
Charisma Cardz hearts and flowers, closes Jan. 31,
Card Makin' Mamas clean and simple, closes Feb. 1,
My Time To Craft things with wings, closes Feb. 2,
Addicted to CAS code word heart, closes Feb. 9

Thursday, January 17, 2013

ABC123

I followed a sketch at Tuesday Morning Sketches ***Top 5!*** for this birthday card for a Teacher friend of mine. The image is from Sassy Studio Designs. I used Kraft cardstock as my base. The red polka dot ribbon was from my stash and I made a fork bow from the thin green polka dot ribbon, also from my stash. I cut the hexagons out of my dp's using my Silhouette. I added Making Memories Funky Black 7/16" letter stickers to them. The image I printed onto white cardstock and colored with Prismacolor pencils to match my friend. I added the cuffs and shirt tails with a white get marker as well. The chalkboard I paper pieced with kraft paper to tie in to the cardstock and colored with a black opaque marker. A white gel pen added the sentiment. Glossy Accents on the apple and glasses finish things off. I've included a picture of my friend too, shhh, don't tell her ;o)

I would like to share my card at:
Crafts and Me Challenges something new, MME Lime Twist dp's, closes Jan. 23,
Moving Along With The Times birthday card, closes Jan. 24, ***Top 3!***
A and T Emerald Faeries celebrations, closes Jan. 31

Monday, January 7, 2013

My Abby is 3

My last catch up post from a very busy holiday season. My Abby turned 3 right before Christmas. So because we have a live tree and have to have the tree up, I always try to incorporate the Christmas decorations into her birthday party theme. This year the theme was Christmas Candy. The awesome tree decorations were from Michael's. I used 2 pool noodles, rolled and tied with ribbon (to hold their shape) and then wrapped in cellophane to look like 2 large candies.
The cake was a Pinterest inspired chocolate cake with chocolate icing, Kit Kat bars and Smarties. Be very glad your child wasn't having a piece before being sent home, lol! I baked 2 9" round chocolate cakes (from the box). Then made some chocolate icing and iced them both. The Kit Kat bars were placed around the outside. If they pulled away from the cake at all I used a little bit of chocolate icing as 'mortar' if you will. This held them on so well that I didn't need to tie a ribbon around to hold them on like some the Pinterest cakes I had seen. I realized part way around that I was not going to have enough Kit Kat bars to place each one side by side with no gap, so I had to space them far enough apart to make it all the way around, but not too far apart that the Smarties on top would fall out. My advice: buy extra Kit Kat bars, really not going to go to waste even if they are not used on the cake ;o) But the little gaps actually made cutting the cake easier, so I leave it to you to decide. Smarties go on top, I did push some in, but the icing had firmed up by this point so I didn't push them all in and yet they stayed really well. What I learned: that this cake can look good, really good, even if a regular person makes it!
For the tray underneath, another Pinterest idea, I bought the hard peppermint candies at Bulk Barn. Here's the link to my Pinspiration. We unwrapped each candy and put them on our pizza pan with some parchment paper on it. You can make them into any shape you like. Then into the oven at 350 degrees for around 8 to 10 minutes. Then remove and let cool completely before removing from the pan. My lessons learned: our tray did have a bit of a bubbled bottom, I think possibly from the holes in the pizza pan. Next time I'd try a cookie sheet. It is also quite fragile. And you will have to watch the children, I had a least 2 try to lick it!


Saturday, January 5, 2013

Merry Kissmas

This is the second of my holiday catch up posts. These were the little classroom treats we made for the all the kids in Kaylee's Kindergarten class. I used the print and cut feature on my Silhouette to cut out all the circles with the students' names on them (2 for each child). Then ran the circles through my Xyron and stuck the names on the bottoms of the Christmas Hershey Kisses. I used red cellophane, cut into squares to wrap both kisses, and tied them with curly ribbon at the top. I used my Silhouette to print and cut the tags that read "Merry Kissmas Love Kaylee" and then wrote each child's name on the back of the tag just for good measure. Sorry about the not so great pictures, they were kind of an afterthought and the flash whites out her tags, but you get the idea, I hope :o) They could pretty easily be made up as personalized Valentine's or Easter treats too.


I had to include a picture of my assistants too. Kaylee was part of the assembly line. Abby really did most of her helping by playing by herself and not making a big mess doing it ;o)
I thought I would link up to some linky parties too:
The Answer Is Chocolate how perfect is that?
   

Friday, January 4, 2013

Happy New Year

I will have a few holiday posts to play catch up but I need to start by wishing you all a very Happy New Year! For my first catch up post we are going to start with Kaylee's Teacher gifts. I made 2 post-it note monogrammed keychains. Her teacher's name is Amanda and she had an intern named Katrina until the end of December as well. I decided to go with their first initials because last names can change. I used MME's heavy Lime Twist cardstock and basically just measured, cut and scored it to fit the large 3"x3" post-it notes. It should be added here that I only used about a 1/3rd of an actual pad because otherwise it is too thick to punch through it. I only used the sticky paper on the back of the notepad to stick it to the cardstock because I wanted them to be able to add another notepad when this one ran out but you could definitely add another strip of adhesive along the back of the pad if you wanted to. I decorated the front with sparkly ribbon, a flower and then their monogrammed letter as the flower center. I used an awl (and the Husband) to punch a hole in the corner of the pad and put a binder ring through it. Some colored ribbon around the ring finished off my project! TIP: I used a lighter to singe the ribbon ends to keep them from fraying.
The binder ring is mostly so that they can clip them onto their purses. That way they'll always have a little pad of paper with them, handy when you're a Teacher!


I would like to share my project at:
Simon Says Stamp and Show anything goes, closes Jan. 6,
Make It Monday linky party, closes Jan. 7,
Top Tip Tuesday anything Christmas, closes Jan. 8,
Tuesday Throwdown bright and happy new year, closes Jan. 8,
4 Crafty Chicks ribbons and bows, closes Jan. 8,
Penny's Paper-Crafty Challenge favorite embellie (ribbon), closes Jan. 9, ***Winner!***
By the Cute and Girly cute and girly, closes Jan. 31,
Ladybug Crafts anything but a card, closes Jan. 31

Sunday, December 16, 2012

For The Choir Director

I used Mo Manning's choir and followed the sketch at Sweet Sketch Wednesday ***Top 3!*** for my card for the Choir Director at our Church. I am on the Ministry and Personnel Committee at Church and we act as a liaison between the staff and the congregation. Each of us are assigned to a specific staff member and the Choir Director is mine (and I am hers). Although there are times when it feels like I am everyone's go to person because as a Stay-at-Home Mom I am the easiest one to get ahold of (a blessing and a curse, lol).
I colored this wonderful living Christmas tree with my Prismacolor pencils. I followed the color scheme at The Playdate Cafe. The dp's were from the Making Memories Twinkle collection. The 3D snowflake ornament is a Silhouette cut file with a snowflake brad in the center. I also used my Diamond Stickles on it to give it some sparkle.
It sure is beginning to feel a lot like Christmas around here!!!

I would like to share my card at:
Papercraft Star a Christmas tree, closes Dec. 18,
Charisma Cardz Christmas makes, closes Dec. 19,
Crafts And Me challenge #114 no blues, closes Dec. 19,
PaperPlay Challenges you're a star, closes Dec. 20,
Winter Wonderland oh Christmas tree, closes Dec. 20,  
Allsorts Challenge oh Christmas tree, closes Dec. 21,
The Squirrel and the Fox Christmas, closes Dec. 27,
Card Makin' Mamas Happy Holidays, closes Jan. 3

Saturday, December 15, 2012

Library Books

My friend Yaz is a librarian and her birthday is this week. I knew this image from The Saturated Canary would be perfect. I colored her using my Prismacolor pencils and used my Distress Ink in Broken China to ink up the doily behind her. Some hotfix Jolee's Jewels Swarovski Elements add the bling to her glasses. I added the text to a Silhouette image flag and printed it. I glued them all onto a cardboard coffee sleeve and inserted a Tim Horton's giftcard. Her school is a block from Tim Horton's, of course everything in Canada is only a block from a Tim Horton's, we have that many of them ;o) Her mug was colored red and gold to match her schools colors.

I would like to share at:
The Saturated Canary Challenge hot chocolate and marshmallows, closes Dec. 19,


Monday, November 26, 2012

TT's 15

My niece Taylor, the little girls call her TT, is turning 15 this week. This card is for her. I followed the sketch at A and T Emerald Faeries. The image is called Danielle with Laptop by Mo Manning. Colored with Prismacolor pencils. The patterned paper was a Silhouette fill pattern, which I have never tried doing before but it was so beautiful and I loved the colors so I filled a square with the patterned 'paper' and then used the internal offset feature to add a 1/4" smaller square inside. I changed the solid line to a dashed one and then changed the line color to navy. I printed both the patterned square and my faux stitching out on the printer. Amazing. Custom patterned paper. The flowers and leaves were also Silhouette files that I cut out of patterned paper, used a Bo Bunny brad for their centers and lifted off the page with pop dots. I used a pink grosgrain ribbon with silver sparkle polka dots on it (didn't photograph very well) and 1/4" loopy blue ribbon. Of course I colored her up to look like Taylor and her tabby (although I think her cat has a bit more gray, but I think I'm close)!
I would like to share my card at:
Crafty Ribbons Challenge use at least 2 ribbons, closes December 6th,
Stampin' For The Weekend use some texture, closes December 7th

Saturday, November 24, 2012

A Princess Card

Well, it's started. My Kaylee got invited to 2 birthday parties last weekend. One on Saturday and one on Sunday. Now that she's started school I think this is going to happen a lot. Honestly, I don't know how I'll afford it if she gets invited to 25 birthday parties this year. And how many presents do 5 year-olds really need? So we said no to the Saturday party but I felt guilty so I sent a card and little gift anyway. The Sunday party was for her new best friend, the little girl she plays with at every recess, so I knew there was no way we could miss. I also wanted to meet her parents too since my Kaylee talks so much about their daughter (and I'm sure they felt the same way).
This card was for the Saturday party that we missed. She was having a Princess party. I overlapped 2 scalloped ovals in my Silhouette program and used the weld feature to join them as a card. Here's a TIP: I used the 'draw a line' feature to draw a line where the fold would be. I then changed the 'line style' to dashed. This created a perforated edge with which to fold my card! I used white backed, glitter cardstock as my card base. The clock was a Silhouette image that I printed onto pink cardstock. The carriage was another Silhouette image cut out of pink glitter sticker paper and black cardstock. It looked so sharp! I realized the sticker paper was going to stick up above the card, so I cut the same shape again out of pink cardstock and stuck the pink glitter paper down to that so that there wouldn't be any exposed sticky paper. Cinderella Honey is a digi stamp from Sassy Studio Designs. I colored her using my Prismacolor pencils. I used Diamond Stickles on her cape and DecoArt Snow Writer as the trim on her cape. Heat set crystals add the bling to her skirt, headband and her earring. I popped her off the page with pop dots. The little flowers were from Michael's and the leaves a Silhouette file.
My inspiration came from a card by Dilyana Kupenska and I just love the way it turned out!
I would like to share my card at:
Stampin' Sisters in Christ for a child, closes Nov. 25,
Fab 'n' Funky Challenges birthday card + 3 of something (flowers, leaves), closes Nov. 27,
Crafts and Me Challenges circles, closes Nov. 28,
Moving Along With The Times lets go dotty, closes Nov. 29,
Top Tip Tuesday kids and teens, closes Dec. 4,

Saturday, November 10, 2012

A Winter Craft

I promised the girls that on the first snow day I had a special craft planned for us. Well today we woke up to snow, and lots of it. It snowed all day today in fact. However I was supposed to go to town for lunch. So naturally our craft did not go smoothly. First I used a Silhouette cut file to cut the hanger and leotard out of black and pink vinyl. However, the vinyl did not stick to the canvas. Then we tried cutting them out of black and pink cardstock, which I ran through my Xyron sticker maker. That seemed to help stick them to the canvas. I painted Kaylee's palm with pink Tempra paint and stuck it down onto the canvas. When we lifted her hand, the leotard came up with it. Arrrgh. I sent Kaylee in to wash and painted Abby's hand. I stuck Abby's hand down and her leotard lifted up too. Kaylee came back clean so I sent Kaylee to help Abby wash while I tried to stick the leotards back down. They both came back clean so I painted each of their other hands, stuck them down, and went with them to wash. That's when I found my good hand towel with hot pink paint on it. I now had a 1/2 hour before I had to leave for town, was not ready, and still had to paint their hands again with the light pink paint. It was then that I called in reinforcements. Grandma and Grandpa were supposed to be coming to babysit so I called and asked how soon they could get here. They came right away. Grandpa was put in the bathroom to help with hand washing. Grandma was given the task of trying to rinse the paint out of my hand towel. I painted the girls hands with light pink acrylic paint because I didn't have any other colors of Tempra paint. I made it town on time. When I got home, I added some ribbon around the waists. I then used Elmer's Craft Bond foam glue to try and stick the leotards and hangers down better. That also seemed to work. Once the girls got up from naps, Kaylee suggested adding flowers. I let them choose their colors and used the Elmer's Glue to stick them on as well. It was then I decided I should also stick the ribbon down. I used small pieces of Skor-Tape under the ribbon behind the flowers. I think I have now used every adhesive imaginable on this craft ;o) I used a paint pen to write the girls names under their dresses. On the back we wrote the date and their ages. They sure look great!!!

Friday, November 2, 2012

The Parlour Is Closed

This is my last post as a DT member at The Poodles Parlour. Jacqui is the extremely talented designer of The Digi Garden images and has decided for personal and health reasons to focus on her designing and to shut down the Challenge Blog. And good for her. We all need to take a little more mental and physical health time these days. But I sure will be sad to see our time as a team come to an end. Be sure to visit the girls and drop a kind word.
The theme for this last challenge is thank-you/Thanksgiving. I chose Emily's Harvest, a Digi Garden image, and followed Shell's sketch at Come and Get It Challenges. I colored Emily with my Prismacolor pencils. The wreath of leaves was a Silhouette image. I embossed the purple paper and mat using CuttleBug's Baby's Breath embossing folder. The sentiment I chose especially for Jacqui, was a quote attributed to Sir Winston Churchill, and I thought it spoke so well to her talent. And to say thank-you to her for having me on her Design Team.
The sponsor this fortnight is Di's Digi Downloads. You can link up 3 entries and my favorite part of being on a Design Team is visiting your inspiring works!

I would like to share my card at:
Twist Of Faith Cards Harvest/Thanks Giving, closes Nov. 6,
Sassy Studio Designs thank-you/Thanksgiving, closes Nov. 8,
Crafting For All Seasons falling leaves, closes Nov. 14

Sunday, October 7, 2012

98 Years Young

Happy Canadian Thanksgiving! May your weekend be filled with family, good food and giving thanks!
My Grandma is turning 98 this week. And she still lives in her own apartment. She also does the 'Senior's' visiting for the Church. She is also a breast cancer survivor. I think it's pretty appropriate that October is her birthday and also breast cancer awareness month. She thinks I am perfect, which is fitting because I think she is perfect.
I used a cut file that I won from craftsUprint for the card base. I used my Silhouette to cut it out. I ran my card through the printer to add the sentiment. The butterfly is a Silhouette file that I cut out of purple vellum. Added some small black Glamrocks to the butterfly with my iRock heat setter and made the butterfly trail the same way.

This is Grandma with my girls just this past September. She bought the party hats and chocolate coins for Kaylee's pirate birthday party. I can't tell you how much it means to me that the girls have had the chance to get to know her. She is such a special member of our family and my Kaylee is named after her (as are several other of her grandchildren and great-grandchildren)!
I would like to share my card at:
Word Art Wednesday love, closes October 10,
The Play Date Cafe color challenge, closes October 11,
CAS-ual Fridays for the girls, celebrate someone special, closes October 12

Friday, October 5, 2012

A Hallowen Easel Card

Hello all! This fortnight's challenge at The Poodles Parlour is Halloween and is sponsored by Bugaboo Stamps and The Digi Garden. Be sure to check out my teamies inspiration too. They will certainly put you into the Halloween Spirit, get it, Spirit, hahaha. I know, puns are awful but I couldn't resist.
I used a Silhouette file to create my easel card. I merged the Bugaboo images Hween Brat Wizard and Hween Bench. I colored them with my Prismacolor pencils and used purple and gold Stickles on his hat and robe and orange Stickles on the pumpkin. Bling on a roll down the side. Pop dots lift my bat and sentiment off the page. The pumpkins along the bottom are another Silhouette cut file and I left room for a sentiment there too which I will add with a white gel pen once I decide who this one is going to.
My lessons learned: I carefully colored and shaded my image and then decided he needed some sparkle. That explains the Stickles. However, I didn't need to be as precise with my coloring if I had decided that ahead of time. Ah well, he has a lovely shaded robe and hat...under all those Stickles ;o)
I would like to share my card at:
Charisma Cardz bling/shiny, closes October 11,
Moving Along With The Times in the dark, closes October 11,
Paper Play shine on, closes October 11,
Catch the Bug Challenge seasonal/fall, closes October 13,
My Sheri Crafts apple or pumpkin, closes October 13, **ooo-la-la award winner!**
Crafting For All Seasons costumes/dress up, closes October 17

Friday, September 21, 2012

A Little Recycling

The challenge this fortnight at The Poodles Parlour is tags. I had a rather clever idea (if I do say so myself) to use a tag with a coffee sleeve. My husband picked me up a sleeve from Starbucks. However it had a very large Starbucks logo on it. So I turned it inside out and used double sided tape to close it again. I used a pre-made tag and Tim Holtz distress inks in Walnut Stain and Pine Needles. My Top Tip: to get my water rings I took an empty water bottle, dabbed it onto the inkpad and stamped it onto my tag. Then spritzed the tag with water. My image is called Cafe Lizzie from Whimsie Doodles. I colored her with Prismacolor pencils using fall colors. I used popdots to lift her off the tag. Tied 2 different ribbons and some raffia through the top to finish.  Maybe not too practical but definitely much nicer than the usual coffee sleeve ;o)
I would like to share my project at:
Top Tip Tuesday recycle it, closes Sept. 24,
The Ribbon Carousel fall into fall + ribbon, closes Sept. 25,
A&T Emerald Fairies use a tag, closes Oct. 2

Thursday, September 20, 2012

Kaylee is 5 *Sigh*

I meant to post this yesterday for International Talk Like A Pirate Day! For Kaylee's 5th Birthday party she chose a pirate theme party. We invited 7 other children (for a total of 9) all under 6, and had 9 adults too. Just as an interesting side fact 3 of the children were triplets, so that upped our numbers significantly, lol.
I used a Silhouette file to create a treasure map invitation. I first cut it out of black patterned paper for the backing and then a beige patterned paper for the front. I ran the front through my printer to add the invite/text and then used my Xyron to glue them together. The back then showed white, so I used Tim Holtz distress ink in Walnut Stain to give it that aged look. Rolled it up and tied it with twine. The bottle, now that was a story. I went to 3 dollar stores (every one in our city) to find colored bottles with a cork in them. There were none. Then I thought maybe the small coke bottles would work but the labels were printed right on the bottles. While in the bottled drinks aisle I spotted the Perrier bottled water bottles. Green, flat bottom, removable label, and screw top. PERFECT! And they were $3.49 for 4, cheaper than I would have paid at a dollar store. PERFECT!


I used a Silhouette cut file to make the cupcake wraps which I cut out of kraft paper and the sails which were cut out of white cardstock. A cocktail toothpick doubled as a flagged mast. We made 24 chocolate cupcakes with chocolate icing. We had 2 left at the end of the party. Almost all of the kids had 2 each, lol. Always a good sign that they were tasty.
 The Armada ;o)
We took 3 cardboard boxes and covered them in mirror tape found at the dollar store in the hardware section. We found little treasure chest cases at a craft wholesaler and filled them with chocolate loonies and toonies and jelly beans. Then we put 3 little chests into each box. I taped the boxes shut with black hockey tape to look like the straps on the chest. Then we buried them in the yard. My mother-in-law drew up 3 maps. My husband used sticks in the shape of an X to mark the spots. The kids absolutely loved digging for buried treasure!
We also bought pirate hats, parrot decorations and a palm tree scene at the craft wholesale warehouse. The pirate swords were from a dollar store. We set up a photo corner and took Kaylee's picture on 'the island' with all of her guests as they came in.
My lessons learned: we should have taped the little chests shut because by the time the kids were done digging up and ripping open the big treasure boxes the little ones had some dirt in them. Luckily kids under 6 aren't bothered by treats with dirt on them. Also the palm tree decorations were just plastic and not wall clings like we thought they were so they didn't look very good on the wall and we had to figure out a way to get them to stay up there. Wouldn't buy those again next time but they did the job for the day.
I would like to share at:
Dream Valley Challenges celebrations, closes Sept. 30

Monday, September 17, 2012

My Anniversary

It was our 12th Wedding Anniversary this week. The husband handed me a store bought card and says, "where's mine? The homemade one.". So that's what I did. He has a point though, that for me anyways, it's the people I'm closest to that are the last to get one of my cards. I'm so busy making them for everyone outside of the house that the people inside the house rarely get one.
I bought the Moon Love digi stamp from Karber Stamps. And I followed the sketch at Sketchy Colors. I loved all the layers to it, even though that is one of my phobias. But my goal is to use more patterned papers and I love the way it turned out. I printed my image right onto my blue patterned paper. Same with my sentiment. Kraft cardstock is my card base. And the husband was very pleased to have a card of his own, and he deserves one. He really is a wonderful man.
I would like to share my card at:
My Sheri Crafts family, closes Sept. 29,
The Crazy Challenge spots or stripes, closes Sept. 30

Sunday, September 9, 2012

My Brother's Birthday

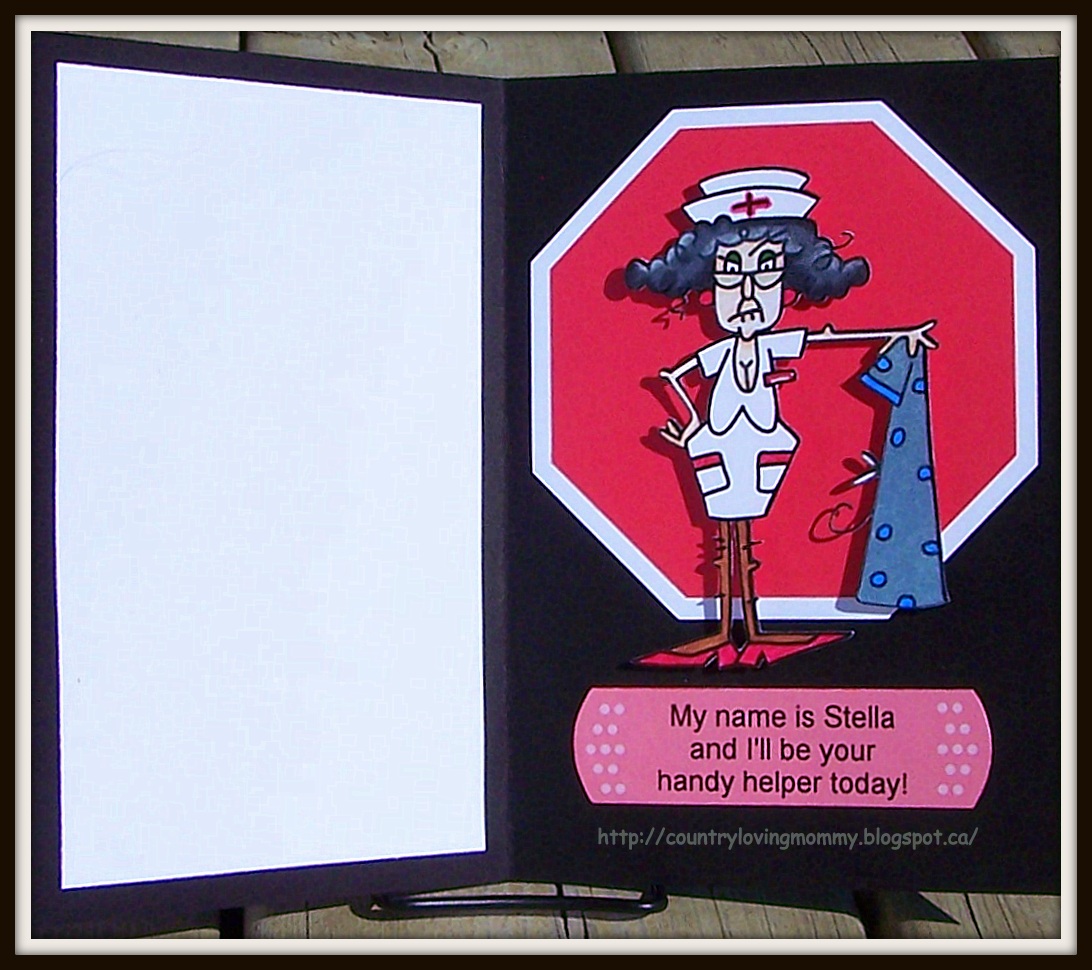
I made this card for my brother who recently started his own home construction business. That is a business that is really booming in our province and in our city. And he's been very busy. I used a Kenny K digi stamp called Home Improvement for the front cover. Inside I used Bugaboo Stamps Stella Nursing ICU. I imported both into my Silhouette and used the print and cut feature to cut them out. I colored them using my Prismacolor pencils and CASE'd Amy's coloring from the Krafty Girlz Embossing Challenge for my Home Improvement image. On my Stella image I added some Glossy Accents to her glasses and name tag. I also tried using my Versamarker Watermark Pen for blending. The Yield sign was a diamond Silhouette shape that I used the knife tool to cut in half. And then the offset feature to make the border. The stop sign was another Silhoeutte image. The banner and bandaids were also Silhouette shapes which I added my sentiments to and then used the print and cut feature again. Used pop dots to lift my images off the pages. Added a little safety pin embellie on the front.
My lessons learned: a Versamark Watermark Pen will blend your colored pencils. However, it takes forever to dry. I learned the hard way that putting my hand or fingers onto the wet coloring would then transfer it onto my uncolored parts.
My cover sentiment reads: Every good handyman needs a good handy helper!
Inside sentiment: My name is Stella and I'll be your handy helper today!


I would like to share my card at:
Scrap-Creations humor, closes Sept. 11,
The Hybrid Chick pop it up, closes Sept. 14,
Sentimental Sundays humor me, closes Sept.16, **Top 3!!!**
Creative Craft Challenges all about the guys, closes Sept. 18,
Hooked On Craft Challenges cards for men, closes Sept. 29,
By The Cute And Girly boys/men, closes Sept. 30