Picture

Picture

Thursday, July 5, 2012

Sponge Bombs

These are so awesome. Of course I found them on Pinterest. And when I found out my nephew was having a water fight down at my parents farm for his 7th birthday party, I knew I had to make these as his present.
I got all of my supplies at a dollar store (where everything is $1.25 now): Carwash style sponges, J cloths and zip ties. You can use several other styles of sponges too and I did, but I liked these ones the best.
Start by cutting your car wash sponges into 1/3rds.
Cut a J cloth into strips the same length and width as your sponges.
Get your zip tie handy. Then start to gather your sponges and cloths, pinching them together as you go. This will give you an idea of how they will look when tied together.
Tie around the middle with a zip tie. Tighten as tight as it will go. Don't go too tightly though or it is possible to rip your sponges.
Snip the zip tie close to the center. Then flouf. Just move the pieces around to fill any gaps.
We bought a plastic tub with handles at Wal-Mart. Filled it with Sponge Bombs and then your tub can be filled with water for your water fight.
Total cost per bomb: 1.46
Zip Tie - .04
Sponges - 1.25
J Cloth (1 cloth will make at least 2 bombs) - .17
Tub $5 at Wal-Mart
They did not all survive the fight though. 7 year-old boys are not known for 'gently' water fighting and our Border Collie kept trying to 'fetch' them too. But there were still some intact at the end of the battle.
These would be great for any summer family gathering!

Sunday, July 1, 2012

Happy Canada Day

It's Canada Day! I am so proud to be Canadian, I think we do a lot of things right and that we don't celebrate it often enough, because we're Canadian, that's just not like us. But on Canada Day we really let our pride shine through and you'll see the Maple Leaf flying everywhere today. So what better day to celebrate my 1 Year Blogaversary!
It has been an amazing year full of fun and learning for me. Every new follower and every comment makes my heart smile. I am just so grateful to you all. 
Thank-you so much for joining in the fun!

Friday, June 29, 2012

Graduation

The little girls Sunday School Teacher is graduating from Grade 12 and going on to University in the Fall. I made this card as a thank-you to her from the little girls.
The challenge this fortnight at The Poodles Parlour is cute and cuddly. And the sponsors are Milk n' Coffee and The Digi Garden. So many great ways to win, and you can enter up to 3 times too!
I used a Milk n' Coffee sponsor image, Charlotte at Paper Ship, and colored her using my Prismacolor pencils. I colored her dress with a black opaque marker, I wanted it to look like a shiny Grad gown. Stickles on the flowers and butterfly and glossy accents on the water added the finishing touches. I used my B00 Frost Blue Copic to add the blue dots around the image. I used my Coluzzle circle for the image and the mat (still without access to my Silhouette, had to go old school, lol). I saw a side easel card and really liked the look so I googled the term and found this YouTube tutorial. I made mine 5 1/2" x 11". Then scored it at 5 1/2" so that mine was just a square. My dp's were cut to 5 1/4" x 5 1/4" and then I just cut the rose paper in half from corner to corner for my upper triangle. For my sentiment, I found a grad cap image and printed it out with my sentiment on it. I then hand cut (gasp) it out. I popped it up on pop dots to use it as my stopper on the bottom. Added ribbon, flowers and gems to finish it off.
My sentiment reads:
When you pass through the waters I will be with you
Isaiah 43:2
I thought it really suited not only my image but a Graduation card too.
My lessons learned: My opaque markers also wet my plain cardstock and pill it.
I look forward to seeing your creations!
I would like to share my card at:
The Crafty Pad more than one fold, closes July 1,
Word Art Wednesday inspirational quote, closes July 4,
Delightful Challenges celebrations, closes July 5,
Fussy and Fancy Challenge fancy fold, closes July 12,
Little Miss Muffet sparkle, closes July 12

Friday, June 15, 2012

Sk8er

This is for my nephew's birthday. He turns 7 on July 2nd. Canada Day is July 1st. So the challenge theme at The Poodles Parlour this fortnight of red, white and blue was pretty perfect for his birthday card. The image is Skateboarder from The Digi Garden. They are the sponsor for this challenge and have such lovely images! Not to mention you have so many ways to win. There is a sponsor prizes, prizes for the top 3 and prizes for our honorable mention "Poodle Picks" as well! I look forward to seeing your cards!
I have been without my computer for going on 3 weeks. I have access to the Internet through The Husband's work laptop but am without my digi files and *GASP* my Silhouette. So I had to get a little creative with this one, but isn't that what we crafter's do best, lol?!?
I followed the sketch at the Stella Says Sketch Challenge. I used my Prismacolor pencils on my image and bought some blending stumps at Michael's. A little baby oil for blending and voila! LOVE the way it turned out. Also used my Frost Blue Copic B00 to outline my image. My sentiment in hand written. Not something you see very often but The Husband's work laptop is not connected to our printer. The maple leaves were added using my parent's printer. Thank goodness they live nearby. I also used their printer to print my digi image. Cute little colored safety pin makes the perfect embellishment for a boy's card.
My lessons learned:
I was very afraid that the baby oil would tear my cardstock. I just used regular white cardstock. However, it held together perfectly and as a side bonus my card smells pretty great too ;o)
I would like to share my card at:
Scrapper's Delights it's a male thing, closes June 16,
Stampin' Sisters In Christ use an image showing action, closes June 17,
Stella Says Sketch Challenge sketch, closes June 17,
Cupcake Craft Challenges red, white and blue, closes June 18,
Sassy Cheryl's birthday, closes June 18,
The Pink Elephant masculine, closes June 18,
Aud Sentiments any sentiment for a child's birthday, closes June 19,
Charisma Cardz male cards, closes June 19,
Creative Card Crew song inspired (Sk8er Boi), closes June 19,
Little Red Wagon boys birthday, closes June 20,
Paper Craft Journey hand colored image, closes June 20

Friday, June 1, 2012

Shopping

Saw this sentiment and knew it was PERFECT for my Mom. She is a quilter. And just like we paper crafters have more paper than we can ever use in a lifetime, she has enough fabric to make enough quilts to rival an enitre Amish community. But she still buys fabric. Just like I still buy paper. This card was for Mom's birthday.
I used the sketch at the Stella Says Sketch challenge. And used Dottie Shops from the Bugaboo Stamps Store. Colored using Prismacolor pencils and Glossy Accents on her jewellry and bow. I also used Tim Holtz distress inks in Spun Sugar to ink round my image. The jewels are Jolee's Swarovski Elements.  Thought the wood look patterned paper really suited the sentiment. I was in the other room cutting the cake and I knew as soon as my Mom opened her card, she was laughing so hard.
Sentiment: Shopping with your Husband is like Hunting with the Game Warden :o)
I would like to share my card at:
Catch the Bug Challenge Stella Says Sketch, closes June 2,
Digital Tuesday Challenge just for laughs, closes June 5,  **Winner!!!**

Thursday, May 31, 2012

Father's Day

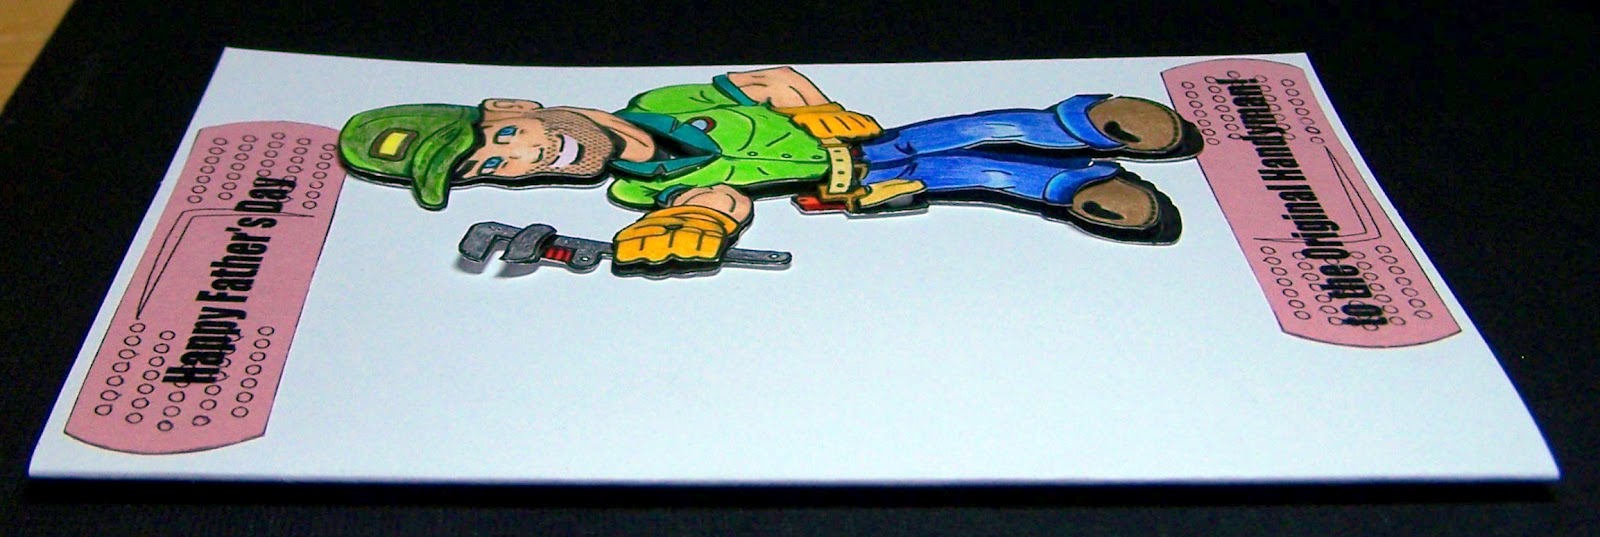
This one is for my Dad. If you knew my Dad, you would understand the band-aids ;o) We phone him for help on every project and as our closest neighbor we are extremely lucky to have him 'on call'. He is very handy, they built their own house, so he's a great neighbor to have. But everytime he and the Husband do a project, one of them bleeds. They usually take turns, but someone always gets a minor injury.
This is also my DT card for The Poodles Parlour Father's Day Challenge. We are sponsored this challenge by Kenny K. And generously sponsored for every challenge by The Digi Garden. So many chances to win! Love it!
I printed and cut the image using my Silhouette. I then printed 3 more copies. They are colored using PrismaColor pencils, although I did color most of my bottom layer with a dark gray marker so you wouldn't see the white as I was layering. I then cut out my layered pieces. Using the back of my 1/32 plastic tsp. I rubbed the back of my pieces adding the dimension to them. I then used small foam pop dots cut to size to layer my pieces on top of my base image. I also colored some of the foam dots with my gray marker as well. Just the ones on the small pieces that you may be able to see from the side. The band-aids are a Silhouette image that I used the sketch pen feature to draw on my pink cardstock, cut them out, and then ran through my printer to add the sentiments.
My lessons learned: I really prefer the pop dots to silicone glue. They are so much neater and cleaner and still hold the shape up very well. I think as I get braver I may even layer more pieces but I wanted to start fairly simply.
I look forward to seeing your Father's Day creations!

I would like to share my card at:
Simon Says Stamp and Show one for the boys, closes June 4,
Tuesday Throwdown make it masculine, closes June 5,
Paper Play Challenges 2 of something (band-aids), closes June 6,
Here Come the Boys anything goes, closes June 10,
Crafting for all Seasons many layers, closes June 13,


Tuesday, May 22, 2012

Whew

My Matron Of Honor just graduated from the Saskatchewan Police College on May 25th. She did things like getting pepper sprayed, driving and shot gun training. So I thought she deserved a very special Graduation card.
I've never made a side step card before. I had a cut file for one that I imported into my Silhouette. However once I got it cut I discovered that the left side/front panel was only 2". Well that would make for a very small image. So I did some tinkering in the Silhouette program and made it 3 1/4". Much better. I used Frantic Graduate digi stamp from Sassy Cheryl's Digis. I colored her using Prismacolor pencils. I'm getting better. I've done a lot of browsing around Google images of colored digi stamps. I haven't tried blending yet but my shading is getting better. I drew some more grass at the bottom. Then I used my Silhouette to create a mask for my image and some clouds. I used Tim Holtz Distress Inks in Pine Needles and Broken China to do the sky and grass backgrounds. I've never 'masked' before. It was tricky because I wasn't sure how to tape my small clouds down without covering the clouds. I did it by working in sections and moving the tape. Really like the look.
For my sentiment I used MachineScript font and adjusted the character spacing until all the letters were touching. Then I used the weld button under the modify tab to join them all together. I used the offset button to create the mat. The Police hat was a Silhouette image. The badge I downloaded from the Internet from the Public Register of Arms, Flags and Badges of Canada. I sure hope that's not illegal ;o) The accents are fabric covered, striped brads.
My lessons learned: I used my B00 Copic to outline my image AFTER I did my masking/inking. That worked really well because my mask was just a bit larger than my image so my inking did not go right to the edges of my image. The outline filled that space really well. This was a lot of work to put together, took the whole day, but soooo worth it. I really like the way it turned out, especially my coloring.
I'd like to share my card at:
Paper Pretties graduation, closes May 22,
Moving Along with the Times keep it real, closes May 23,
4 Crafty Chicks graduation, closes May 23,
Stampin' Sisters in Christ build up your card/layers, closes May 27,
My Craft Spot congratulations, closes May 28,
Sassy Cheryl's favorite color combination (blue & white), closes May 28,
The Crazy Challenge 3D, closes May 28,
Tuesday Throwdown 3D, closes May 29,
Papertake Weekly national colors (red & white), closes May 29,
Creative Card Crew dimension, closes June 3

Saturday, May 12, 2012

My First 3D Project

This is for my Mom. I used a Silhouette cut file called card kit flower pot. I have seen lots of inspiration for these around Blogland and thought I'd give it a try. The flower pot I cut out of Kraft paper. The inside and leaves I cut out of green cardstock. Then I cut another inside out of beige, ran it through the printer to add the sentiment, and then just cut the leaves off and adhered it on top of the green. I cut some more leaves by hand from lime green cardstock. I used my Prismacolor pencils to add some color to the leaves. I used used the back of my plastic 1/32 tsp. on a soft pad to curl the leaves. Then I used Elmer's Silicone Rubber Sealant in behind. My Mom's favorite flowers are pansies, so rather than use the flowers that came with the kit cut file I used Silhouette pansy cut files in 2 different styles. I used my 1/32 tsp. again to bow the petals and silicone glue to adhere them right on top of the leaves. Some ribbon and a bow finish the pot.
My lessons learned: The silicone glue takes a long time to dry, can be messy, and has a pretty strong smell. I will try this again, but I will try using popdots, thin ones. Also, all the little black veins in the pansies were very difficult to glue on. I could have drawn them on with a black marker and saved myself some tweezer work, lol.
Wishing all Moms a very Happy Mother's Day!!!
Took advantage of some natural sunlight and a clean carpet to take my pictures today, neither one is ever a guarantee around here, but today we had both ;o)
I would like to share my card at:
Paper Sundaes Mother's Day, closes May 12,
Love to Create For Mom, closes May 13,
The Paper Variety May flowers, closes May 13,
Kaboodle Doodles Honoring Mothers, closes May 14,
Paper Pretties use ribbon, closes May 14,
The Pink Elephant Challenge all about Mom, closes May 14,
Crafting For All Seasons handmade flowers, closes May 15,
The Squirrel and The Fox one for the girls, closes May 15,
The Sisterhood of Crafters May flowers, closes May 20,
Penny's Paper-Crafty Challenge I love you Mom, closes May 23

Friday, May 11, 2012

Mother-In-Law Mother's Day

I used these 2 cutie images from The Digi Garden. They represent The Husband and his sister. I imported them into my Silhouette and used the object, arrange, and send to back button to place her arm behind him so they look as though she has her arm around him. Awwww. I used the Headline News font for the sentiment. Printed my images and sentiment onto white cardstock. Colored my images with my E11 copic and Prismacolor pencils. I paper pieced his hat, pocket and patch using red cardstock. The flower and leaves are Silhouette images. I used a button and some twinery twine for the flower center. The stitching is done by swapping my Silhouette blade for a pink glitter sketch pen. Then I made a rectangle. I changed the line style to dashed, hit cut and easy peasy stitched looking line, in pink, too cool. I will definitely use this technique again.
My lessons learned: My first attempt at coloring up my image looked like I did it on a bus. So I reprinted my image and tried again. I have got to get real markers...and real paper. My white cardstock just isn't cutting it for my digi images. Thank goodness for paper piecing. I feel so out of my league with Copics, I'm seriously considering the Tim Holtz markers. Anyone have any experience with them?
I'd like to share my card at:
My Sheri Crafts Mother's Day card with flowers, closes May 11,
Bugaboo Stamps anything goes, closes May 12,
Paper Sundaes Mother's Day, closes May 12,
Love to Create for Mom, closes May 13,
Oldie But A Goodie dies and punches, closes May 14,
Sassy Cheryl's stitching, faux or real, closes May 14,
The Squirrel and the Fox one for the girls, closes May 15,

Tuesday, May 8, 2012

From The Little Girls

I think this may be one of my favorites. This was for The Husband's birthday. I used an image from Tiddly Inks called Daddy's Girl. I imported it into my Silhouette and replicated it. Then flipped the second one horizontally and resized it smaller. I used the font Fiolex Girls and added the sentiment. I then printed both image and sentiment right out onto my card. I used Marvy Opaque Stix to add the color. I love the way they dried to an almost painted look!
My lessons learned (tip): When running your card through the printer, put the natural curve of your card up. I placed it down and it kept getting caught in the printer because it created this little bow in the paper that would not feed flat through the printer. It seemed so opposite of what I should be doing to put that curve up, but that was the only way it worked. Go figure.
I would like to share my card at:
Simon Says birthday, closes May 9,
CAS-ual Fridays clean and simple birthday, closes May 10,
Come and Get it Challenges for the boys, closes May 11,
Top Tip Tuesday clean and simple, closes May 21


Thursday, April 26, 2012

WooHoo!!!

Hello all, and welcome to my first post as a new Design Team member at The Poodles Parlour!!! I am so looking forward to working with my new DT members, these are some lovely, lovely ladies. And I am as excited to see all of your work too. This challenge is an Anything Goes challenge and is sponsored by Stamp N Doodle. You have until Wednesday, May 9th and can link up 3 entries if you'd like. I look forward to seeing them!
My card is my Dad's birthday card. He turned 69 last week and has a really great sense of humor. He looks a little like Gus, only has more hair, lol. But Gus really was the logical choice for his card. Gus is from the Bugaboo Stamps store. I decided to make the sentiment appear as though it was a framed embroidery. So I picked some wood grain patterned paper for the flooring and some busy floral patterned paper to act as wallpaper. I used a Silhouette scallop frame to cut out my wall frame and used Topstitch font and my printer to add the sentiment. The Sentiment says, 'Women are like Angels, always up in the air harping about something!' I used some twine and a brad to complete the wall frame look. For Gus, I imported him into my Silhouette used the print and cut feature to cut him out. I paper pieced his shirt and chair to look like my Dad's. The rest of him was colored with Zig markers and Prismacolor pencils. Added Glossy Accents to his bottle and glasses. I used pop dots to lift him off the page. Just a little note on my Dad's sense of humor, when he read his card he looked at my Mom and said, "she's my Angel". At his age I think he should be careful about offending women or Angels, lol.
My lessons learned: The little piece of yellow and white twine that I used for the picture frame showed more white than yellow and blended in too well, so I used my yellow marker to color the white parts yellow. It still blends in more than I'd like, but it is better.
Please stop by my teamies blogs and leave them some love too!
And here's my Dad and Mom, Gus and his Angel, lol.
We gave them a canvas photo of all us at Thanksgiving last year.
I'd like to share my card at:
Crafty Boots Challenge no girls allowed, closes Apr. 29,
Shopping our Stash starts with b (Bugaboo stamp), closes May 1,
Daisy Doodles one for the boys, closes May 6,
Penny's Paper-Crafty Challenge Happy Birthday, closes May 8,
Craft Us Crazy favorite stamp company (Bugaboo), closes May 8

Sunday, April 15, 2012

These Are So Cool

I LOVE this project! First of all Superstore had their anti-bacterial pillows on with a coupon for buy 1 for $10 get 1 for $1. I bought 8 for this project. Total $44. I don't think $5.50 is bad for a pillow but you could buy cheaper if you wanted. I liked the anti-bacterial because I knew they would be on the floor. Then, according to the pictures on Pinterest, you sew together 5 pillowcases, insert pillows and then sew them closed. I wanted to be able to wash the covers, so that wasn't going to work for me. I considered fabric, but that would be too expensive. I considered buying sheets, which may have worked and I also considered King size pillowcases. But then I would still need a way to open and close them. I considered Velcro, snaps and zippers, but none were perfect. Until...I thought of pillow shams. They have built in closures and the flanges allow them to be sewn together without squishing your pillows inside. I found a 2 pack of standard shams at Sears Outlet Store for $3. I bought 4 packages. Total $12. I had cashed in my points for a $10 gift card, so my actual cost for the shams was Total $2. This made my total per pillow mat $21. I can live with that. My Mom sewed them together, overlapping the flanged edges. We inserted the pillows and TA DA!
Left flat they make a padded sleeping mat. The front and backs above and 1 picture with my models! The patterned backs should help to not show the dirt too. Genius!
This is with one pillow folded underneath for watching a movie or playing games.
And my models of course!

 
This is with 2 pillows folded underneath. Makes a great chair for reading or gaming. As you can see my models have now decided to cuddle together. I love my models!


Friday, April 13, 2012

Easter Sunday

I made this card for Reverend John for Easter Sunday. A story in our Church newsletter a couple of weeks ago talked about a blind boy flying a kite. And even though he could not see it he could feel the tugging. Much like God's love and faith, even though we may not always be able to see them, we can feel the tugging. That was what inspired my card.
The image is a Silhouette image and I thought it had a nice Spring feel to it too. I cut out the scallop shape using my Silhouette and ran it through the printer to add the sentiment. I used a black brad which I folded under the tag rather than push through my card to turn my scallop into a tag.
For those of you that celebrate Easter, I hope you all had a lovely Easter Sunday spent celebrating the Resurrection and the Life with your family. And a few chocolaty treats and jellybean sweets too ;o)
I would like to share my card at:
Crazy 4 Challenges blue and white + 1 other color, closes Apr. 14,
Sentimental Sundays silhouette + sentiment, closes Apr. 15,
Word Art Wednesday challenge #23, closes Apr. 18,
CAS-ual Fridays  opposites attract, closes Apr. 20

Tuesday, April 3, 2012

The Last One

This is my last challenge as Guest Designer at Digital Tuesday Challenge. I enjoyed visiting the Design Team blogs and getting to know them. I learned a lot about what goes into putting on a weekly challenge blog from Lora (the challenge blog owner). There is a lot of coordination that goes into every week, from themes to sponsor images to posting links to the DT's creations each week. And throw some real life into the mix and it makes for a very busy job. Thank-you Lora for this opportunity. I also enjoyed visiting the entries each week and checking out the other crafty ladies in blogland. There is a lot of inspiration to be had out there. Alright enough with the mushy stuff.
The theme this week is Easter and the sponsor is My Grafico. These are some of the sweetest Easter images I have seen and they have so much versatility. I enlarged the striped egg image to 4" high and 3.65" wide in my Silhouette program and printed it onto light purple cardstock. I cut it out by hand. I used MME Lime Twist twine in "Happy", "Hello", and "Together". Or purple, pink and mint green for normal people. I alternated them between the stripes on my egg and adhered them using my Zig glue pen. Then I used the print and cut feature on the Silhouette for my little girl bunny image. She is colored with glitter gel pens and lifted off of the egg using pop dots. I used a Silhouette image to make the Easter basket pockets. I printed and cut out the tulips using my Silhouette too. They are colored with Prismacolor pencil crayons. I used purple Easter 'grass' to stuff the basket and put my twine egg into it. We are making these for the girls Sunday School Teachers for Easter, we just added the sentiment to the back.
Here's the whole batch...the girls colored the rest of the eggs!
I would like to share them at:
Love to create Easter challenge, closes Apr. 9,
Kaboodle Doodles anything but a rectangle, closes Apr. 9,
Incy Wincy Designs Easter, closes Apr. 9,
Crafty Sentiments bunnies, closes Apr. 9,
Top Tip Tuesday Easter and or animals, closes Apr. 9

Tuesday, March 27, 2012

The Blues

This weeks theme at Digital Tuesday Challenge (where I am the Guest Designer this month, still happy dancing) is your favorite color. My favorite color is blue. But I am mostly in need of Easter cards right now so I wasn't sure how to make this work. I love this image from Pollycraft called Follow the Leader. I thought it would be wonderful with blues and a couple of little yellow duckies! I printed my image out on a piece of white cardstock 3 3/4" by 5 1/4". I extended the grass line right to the edge of the paper with a black marker. I colored the image using Prismacolor pencil crayons. And outlined it using my other Copic B00. I paper pieced the flower above and popped it off the page with pop dots to add a little dimension. I colored the flower underneath a dark gray. While I have seen this idea around I was inspired to try it by Amy's post from the DT for last weeks challenge. Be sure to check out all the DT posts, there's so much more inspiration there than just a picture! I used Tim Holtz Distress Ink in Broken China to color the sky. I think I maybe got a little carried away with it, but it does make for a blue card, lol!
Added a 3/8" Grosgrain ribbon in Island Blue as a border for under the image. The bubble border was a Silhouette image cut out of sparkly light blue/gray paper. I then cut just the outer edge of the same border from white cardstock to put in behind. I added Diamond Sparkles to the bubble accents. A thin strip of teal cardstock makes the top border. The clouds were also a Silhouette image cut from Dollar Store glitter paper and I cut and traced the sun from yellow felt. A piece of cardstock with my Happy Easter sentiment makes the sun's center. I used pop dots to lift the sun off the page too.
Be sure to join in this weeks challenge sponsored by Robyn's Fetish!
Thank-you for visiting!


Saturday, March 24, 2012

Not Your Typical Wedding Card

This is a complete scraplift from Birds Cards. She offered a cut file and a tutorial on how to make this card. I customized mine to match the bikes of our 2 friends that are getting married. I also added the ribbon ties at the back with some eyelets tied on to look like tin cans and the Just Married signs. Other than that I just imported the cut file into my Silhouette, cut it out, and put it together. It was a little like putting together a ship in a bottle because of the small pieces. While it is time consuming, it creates a unique and personalized card for friends!
My lessons learned: I think I should have made it bigger. I made it to fit an 11" piece of cardstock, so each bike is 5 1/2" long. But bigger would have been better (and easier). I also wish I had used a heavier cardstock for my bike/card base. It does stand up on its own, and I didn't want it too thick with all the layers I knew I was adding, but it could have used a more solid base.
I would like to share my card at:
Love to Create anything goes, closes Mar. 25,
Cute Card Thursday anything goes, closes Mar. 28,
The Poodles Parlour anything goes, closes Mar. 30,
Crafty Purple Frog anything goes, closes Apr. 4,  *won 3rd prize*
Fussy and Fancy anything but square/rectangle, closes Apr. 6

Tuesday, March 20, 2012

Digital Tuesday Challenge Guest Designer (That's Me)

Hello all, and welcome to my new followers! I appreciate each and every one of you! I hope all the UK Mums had a wonderful Happy Mother's Day and were treated royally!
This week at Digital Tuesday Challenge the theme is 'Life is Peachy'. Now I didn't have a lot of peach paper, so I went with all the different tones of peach; pink, orange, yellow, tan and peach.....and blue, but just for the clouds :o) I decided to make a birthday card for my niece Marley. She turned 3 on March 18th. My image is Woodland Lucy from All That Scraps. Colored with Prismacolor pencils, Zig markers, and my Copic (E11). I used Diamond Sparkles on her lace and barrette. I embossed the background frame with Cuttlebug's Seeing Spots folder. Inked the edges of the pink mat and then used Distress Inks on the corners of the inside frame. I used the print and cut feature on my Silhouette to cut out my image and set her on the edge of the frame. The kite and clouds were a free Silhouette image this week. It even cut the kite tail perfectly. My goodness I love that machine. I added faux stitching and popdots to the kite and clouds. The little pink flowers were from Michael's dollar bin and the peach one is a rolled flower I made.
My lessons learned: my embossing folder is a 4x6 and my card was a 5x5. So I ran my cardstock through my Sizzix Texture Boutique (the one that looks like a purse) once then lined up the dots and ran it through again. This did create a bit of a seam where I overlapped them, but since this was the background frame, by the time I added all the layers it was barely noticeable. Another trick I've learned is to color the white parts of my image with a white pencil crayon. It just adds a nice bit of shine to your otherwise dull white cardstock.
Be sure to join in the challenge this week as the sponsor is Spesch Stamps! And thank-you for dropping by!

Wednesday, March 14, 2012

Happy St. Patrick's Day

I love St. Patrick's Day. It is almost my favorite holiday. So I made this card for my Grandma. You've heard me talk about her before, she is 97, still has her own apartment, and does the Seniors Home visits for the Church. She's a very special lady.
I used a doily lace Silhouette image for my card base. I ungrouped the image and then deleted the inside row of triangles from the doily so that my image could be bigger. I expanded the center section so that it just reached the new inside row of cuts. Cut out my layers and used my printer to put my image onto my white cardstock. My cutie digistamp is from Tiddly Inks new Wryn collection.  I cut the base out of green glitter cardstock, with a white back for my sentiment. I ran the base through the printer to add the Irish verse and then went over it with my green glitter gel pen. The overlay was cut out of regular green cardstock. I cut out the center piece from white cardstock and ran it through the printer to add the image. I colored her with a combination of Prismacolor pencil crayons and my E11 Copic. I also bought another Copic. Now I have 2. I used B00 (Frost Blue) to outline my image. That's going to take some practice, but I like the look. Green Imaginisce glam rocks set with my iRock are her hair barrettes. I used my Silhouette to cut out some very small shamrocks from 3 different colors of cardstock. I placed them over the flowers in the image to create a shamrock bouquet. The centers are some very small, self-adhesive rhinestone gems found at the Dollar Store. I used an orange Gingham ribbon for my bow. For my butterflies I cut 2 sizes of orange cardstock butterflies and the same 2 sizes of a checkered vellum to go over top.
My lessons learned: Don't press down too hard when outlining your image or your thin blue line turns into a thick blue line very quickly. The blue outline does cover up any bleeds from your coloring~bonus. I did have to replace some of the shamrocks because they absorbed the blue Copic color as well.
I would like to share my card at:
Pixie Dust Studio show us your Irish, closes Mar. 14,
Card Crafter's Circle orange and green and St. Patrick's Day, closes Mar. 15,
Card Makin Mamas let's see some green, closes Mar. 15,
Simply Create Too I'm sooo lucky, closes Mar. 15,
Kaboodle Doodles show green, closes Mar. 18,
Sassy Cheryl's wearin' of the green, closes Mar. 19,
Simon Says a bit o' green, closes Mar. 21,
The Squirrel and the Fox for someone you love (My Grandma Kay), closes Mar. 23,
Deep Ocean Challenge butterflies, closes Mar. 26

Tuesday, March 13, 2012

Guest Designer *Happy Dance*

I applied at Digital Tuesday Challenge for their Design Team. While I didn't make the design team, a very, very, lovely lady named Lora offered me a Guest Design spot for a month. I haven't even mentioned anything about it until today because I wanted to be sure it actually happened first (you know, one of those pinch me kind of moments). Anyway, here we are, my first card as Guest Designer. The theme this week is Think Spring. My image is Charlotte and Butterfly from Milk N Coffee Digital Stamps.
I colored my image with a combination of my Copic (E11), glitter gel pens, prismacolor pencils and Zig markers. I used the rounded lattice card template from my Silhouette images to make the lattice background. I used a rolled flower template from Birds Cards that I imported into my Silhouette and cut my flowers out of. She also provides an awesome rolled flower tutorial on her site too. I cut the daisy from a pastel patterned paper and placed a gem in the centre. I LOVE the way the patterened paper turned out. For the 2 smaller flowers I just used cardstock and a small half pearl in each centre. The bow is a fork bow made from my potato masher. I found the bows made with a regular fork are very small. When I googled "fork bow" and I selected 'images', I saw someone had used a potato masher, which works well to make a bigger bow. A flower brad makes the center of the bow.
My lessons learned: you can get away with doing most of the shaping for your rolled flower petals after you have rolled them. The inside ones get wound pretty tightly so it's really just the outside ones you'll want to bend and shape once you've rolled them.
Hope this has you thinking Spring, and better yet maybe even enjoying some Spring-like weather!


Saturday, March 10, 2012

A Good Laugh

This one is funny. It's for one of the husband's best friends. First I ran my card through my printer to add the front page sentiment. I received this lovely (if not very practical in our good old Canadian climate) digistamp from Sassy Studio Designs. I imported the image into my Silhouette and flipped it horizontally. I followed the sketch at Inspirational Card Sketches. To make the background for my stamp I took an oval frame, rotated it 90 degrees and used the knife tool in my Silhouette to cut the bottom third off of it. Then I used the offset button to create a 1/4" mat. I used double sided tape to make the folds in the ribbon and added buttons tied with twine on each side of the ribbon. I colored my image using Prismacolor pencils and Zig markers and my Copic (E11). I paper pieced her bikini, with very small pieces of red gingham patterned paper. Very small. I printed the Stella image from Bugaboo Stamps right onto the inside of the card, along with the inside sentiment. That meant I couldn't use my Copic for her skin, so I just used the Prismacolor pencils and my markers for her. I used glossy accents on her name tag and glasses.
I hope he has a laugh!
Front page sentiment: At your age chasing younger women is bad for your health...
Inside sentiment: At least the healthcare is free!
I would like to share my card at:
Creative Card Crew humor, closes Mar. 11,
Charisma Cardz ribbon, closes Mar. 13,
Creative Craft Challenge boys will be boys,closes Mar. 13,
The Poodles Parlour birthday, closes Mar. 13,
Bugaboo Stamps show us your humor, closes Mar. 17, *2nd Prize Winner!*
Divas by Design favorite things (digi stamps), closes Mar. 21

Friday, February 24, 2012

Her Jacket Makes The Whole Card

This is for one of my best friends. The same one I made Teacher Margaret for. Her birthday is March 2nd and she is a Teacher. I used Bugaboo Stamps Stella Calendar Months - September. I followed the sketch at the Catch the Bug challenge blog but I decided to use my Silhouette to cut out the oval and place my Stella digi right inside the card. I make this sound easy, it was not. My cutting mats are not lined up with the grid in my Silhouette program so cutting the oval right out of the card was a lot of trial and error (and cards). Then I printed Stella right onto my card by running the card taped to a piece of computer paper through the printer. Again it was lined up in my Silhouette program but was just a little off when it came out of the printer. Might have been the actual folding of the card that changed it but on the screen Stella was completely visible in the oval. I used a Silhouette pattern to create the apple patterned paper 1/4" smaller than my card. Since I couldn't use the Silhouette to cut an oval out of the patterned paper (I had no idea how to line it up properly), I traced the oval on the card and hand cut it out of the inside of the patterned paper. The green paper with the sentiment was also printed from the Silhoeutte program. Again I traced the oval and handcut it out then cut right down the middle both ways so that I just had to add the top and bottom corners. Used the iRock to set the black Glamrocks in the opposite corners. I colored Stella with my EK Success pencil crayon/Zig markers combo and added Glossy Accents to her glasses and the apple. Stella also got a pair of rose colored glasses. Every Teacher wears them you know ;o) I wrote on the chalkboard with a white gel pen and paper pieced Stella's skirt and jacket. The fact that the jacket looks like it was made out of upholstery fabric made this whole card for me. LOVE how that turned out!
My lessons learned: when I made my oval so big it weakened the narrow outside of the card. Then when I applied the patterned paper to the front it created a crease there. So I added a piece of yellow cardstock on the inside as a stabilizer. Next time I will not make the oval as big.
I would like to share my card at:
Paper Sundaes birthdays, closes Feb. 25,
The Pink Elephant printing, closes Feb. 26,
Sassy Cheryl's no embossing, closes Feb. 28,
The Poodles Parlour female, closes Feb. 28,
Simon Says 3 different papers, closes Feb. 29,
Craft Your Days Away paper piecing, closes Mar. 1,
The Sisterhood of Crafters use a digi, closes Mar. 4

Tuesday, February 14, 2012

The Works

This one has it all. Tulle, ribbon, handmade flowers, pearls, distressing, embossing, you name it we got it! This is not my usual style, I'm not usually so...dimensional, but it does seem to be the current style so I wanted to give it a try.
I loved this freebie image from Saturated Canary. I think you will be seeing a lot of cards made with this image! The artist has been having problems with people copying her work and selling the images as their own. So infuriating. Especially because digi artists have been so generous sharing their images with freebies and by sponsoring challenges, which is the main reason I enter them, to add to my digi library by hopefully winning new images. It's not possible to buy all the ones I love so I try to win them. If artists are losing their work to rip off artists I'm worried they may have to stop offering free images. NOOOOO! Soapbox moment over, thank-you. 
I used a pink polka dotty patterned paper and embossed it with the Cuttlebug Script embossing folder. I then distressed it with my Tim Holtz paper distresser. The frame is a Silhouette image, cut out with my Silhouette. Then I threaded red ribbon through the holes around the frame and just tied it at the back. Colored my image with EK Success pencil crayons, Zig markers and my 1 Copic (E11). The flowers were a cut file and tutorial from Birds Cards. I resized the same cut file twice in my Silhouette to make the 2 different sizes of flowers and they both worked perfectly. The tulle I folded into a fan and then attached it with double sided tape. Pop dots lift the image off the page (mostly so you don't see a bump under the image where the tulle was attached). And 4 large half pearls accent the corners.
My lessons learned: I always thought you NEVER put pink and red together, but I have seen lots of examples over the past few weeks where they work very well together. A little trick I did with my coloring this time, I colored with my pencil crayons first and then went over them with my markers. The waxy pencil crayons didn't allow the markers to wet the cardstock and pill it like I have been struggling with in the past. It also provided a nice shine too. I will get this down eventually, my coloring is still very much a work in progress (who'd have thought I'd be saying that at 30 something, lol)!
I'd like to share my card at:
C.R.A.F.T. Challenge Valentine's Day, closes Feb. 15,
Bugaboo Stamps photo inspiration (roses), closes Feb. 18,
Paper Sundaes sundae bar, toppings distressing + pearls, closes Feb. 18,
Come and Get it Challenges red, white, pink + one neutral, closes Feb. 18,
Dream Valley Challenges Valentine, closes Feb. 19,
Crafty Sentiments love, closes Feb. 20,
Crafty Purple Frog flower power, closes Feb. 23,
Creative Craft Challenges Valentine's Day, closes Feb. 28,

Monday, February 13, 2012

I Can't Believe These Turned Out So Well

We made these crayon Valentine's. I saw them on Pinterest. The link took me too a flickr page with a set of photo instructions here. I went to the Dollar Store and bought 2 red silicone heart shaped muffin tins. I also bought 2 boxes of crayons. You could easily use up all of your broken crayons with this project. Daddy and Kaylee peeled the wrappers off the crayons and then Daddy cut them up into various sizes of pieces. We took out the black ones and didn't use very many of the brown because I wasn't sure how they would spread once in the oven. Kaylee and I put even amounts of each color into the tins. You don't have to fill the tins, as long as the bottom is covered. Once we got all the pieces in ours were about half full. Into the oven at 230°F for 15 minutes. Let them cool and then remove from silicone tins. Marvel at their waxy goodness!!! I printed the cards from the blog The Long Thread. I did use my corner punch to round the edges. I used pop dots to attach my crayons to the cards. Because the back of the crayon is not completely flat you will need to be creative to attach them to the cards. That's why the pop dots worked. I made 12 of them and Kaylee took 6 to Sunday School. She was so excited when there were only 5 other kids so got to bring home one of her own Valentine's!
My lessons learned: use real crayons. I bought the cheap ones that don't color very well and the kids instantly wanted to use their hearts to color. They don't color very well. But they would if we had used the real crayons. We put our silicone tins, which were very squishy, on a cookie sheet to make it easier to put them in and out of the oven. You could easily choose whatever colors you wanted to include for crayons too.
 

Thursday, February 9, 2012

The Tots Teacher

This Valentine is for Ashlyn. She is in Grade 12 and is the Sunday School teacher in the Tots room (2 & 3 year-olds). She taught my Kaylee and made such an impression on her that Kaylee still seeks her out every Sunday. She also told Kaylee's Sunday School teacher now that Kaylee could come back anytime to her room if she ever had any troubles in her new room (awwww). Well as of last week she's now got my Abby. So I wanted to make a very special Valentine for her.
I used a freebie image from Whimsie Doodles (how awesome is she!!! and free too!!! are you kidding me?)! I colored her using my glitter gel pens and used red Stickles on the heart. For her face I used my 1 new Copic E11 (be gentle). I'm still learning that it takes a few 'coats' for lack of a better word to make it look even. I added the purple bangs because it is for a 17 year-old and I LOVE how they turned out! (Ashlyn does not have purple bangs by the way). I used pink polka dotty patterned paper for the frame. The frame is a Silhouette image. Sent it through the printer to add my sentiment on the back.
I would like to share my Valentine at:
One Stop Craft Challenge for the one I love, closes Feb. 10,
Bugaboo Stamps anything goes, closes Feb. 11,
Tuesday Throwdown be my Valentine, closes Feb. 13,
Stamps R Us Valentine/love, closes Feb. 13,
Charisma Cardz things with wings, closes Feb. 15,
Paper Crafting Journey fairies, closes Feb. 15,
C.R.A.F.T. Challenge Valentines, closes Feb. 15,
Cute Card Thursday pink Valentine, closes Feb. 16,
Do You Stack Up love, closes Feb. 16