Picture

Picture

Thursday, May 31, 2012

Father's Day

This one is for my Dad. If you knew my Dad, you would understand the band-aids ;o) We phone him for help on every project and as our closest neighbor we are extremely lucky to have him 'on call'. He is very handy, they built their own house, so he's a great neighbor to have. But everytime he and the Husband do a project, one of them bleeds. They usually take turns, but someone always gets a minor injury.
This is also my DT card for The Poodles Parlour Father's Day Challenge. We are sponsored this challenge by Kenny K. And generously sponsored for every challenge by The Digi Garden. So many chances to win! Love it!
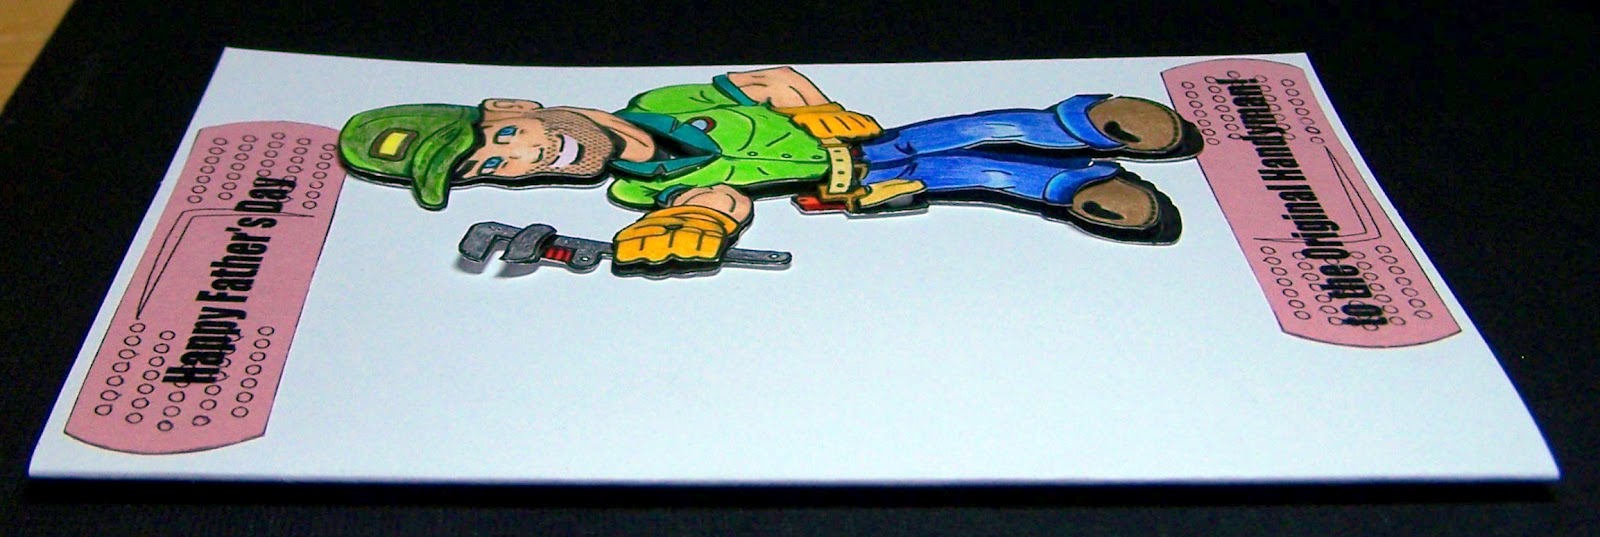
I printed and cut the image using my Silhouette. I then printed 3 more copies. They are colored using PrismaColor pencils, although I did color most of my bottom layer with a dark gray marker so you wouldn't see the white as I was layering. I then cut out my layered pieces. Using the back of my 1/32 plastic tsp. I rubbed the back of my pieces adding the dimension to them. I then used small foam pop dots cut to size to layer my pieces on top of my base image. I also colored some of the foam dots with my gray marker as well. Just the ones on the small pieces that you may be able to see from the side. The band-aids are a Silhouette image that I used the sketch pen feature to draw on my pink cardstock, cut them out, and then ran through my printer to add the sentiments.
My lessons learned: I really prefer the pop dots to silicone glue. They are so much neater and cleaner and still hold the shape up very well. I think as I get braver I may even layer more pieces but I wanted to start fairly simply.
I look forward to seeing your Father's Day creations!

I would like to share my card at:
Simon Says Stamp and Show one for the boys, closes June 4,
Tuesday Throwdown make it masculine, closes June 5,
Paper Play Challenges 2 of something (band-aids), closes June 6,
Here Come the Boys anything goes, closes June 10,
Crafting for all Seasons many layers, closes June 13,


Tuesday, May 22, 2012

Whew

My Matron Of Honor just graduated from the Saskatchewan Police College on May 25th. She did things like getting pepper sprayed, driving and shot gun training. So I thought she deserved a very special Graduation card.
I've never made a side step card before. I had a cut file for one that I imported into my Silhouette. However once I got it cut I discovered that the left side/front panel was only 2". Well that would make for a very small image. So I did some tinkering in the Silhouette program and made it 3 1/4". Much better. I used Frantic Graduate digi stamp from Sassy Cheryl's Digis. I colored her using Prismacolor pencils. I'm getting better. I've done a lot of browsing around Google images of colored digi stamps. I haven't tried blending yet but my shading is getting better. I drew some more grass at the bottom. Then I used my Silhouette to create a mask for my image and some clouds. I used Tim Holtz Distress Inks in Pine Needles and Broken China to do the sky and grass backgrounds. I've never 'masked' before. It was tricky because I wasn't sure how to tape my small clouds down without covering the clouds. I did it by working in sections and moving the tape. Really like the look.
For my sentiment I used MachineScript font and adjusted the character spacing until all the letters were touching. Then I used the weld button under the modify tab to join them all together. I used the offset button to create the mat. The Police hat was a Silhouette image. The badge I downloaded from the Internet from the Public Register of Arms, Flags and Badges of Canada. I sure hope that's not illegal ;o) The accents are fabric covered, striped brads.
My lessons learned: I used my B00 Copic to outline my image AFTER I did my masking/inking. That worked really well because my mask was just a bit larger than my image so my inking did not go right to the edges of my image. The outline filled that space really well. This was a lot of work to put together, took the whole day, but soooo worth it. I really like the way it turned out, especially my coloring.
I'd like to share my card at:
Paper Pretties graduation, closes May 22,
Moving Along with the Times keep it real, closes May 23,
4 Crafty Chicks graduation, closes May 23,
Stampin' Sisters in Christ build up your card/layers, closes May 27,
My Craft Spot congratulations, closes May 28,
Sassy Cheryl's favorite color combination (blue & white), closes May 28,
The Crazy Challenge 3D, closes May 28,
Tuesday Throwdown 3D, closes May 29,
Papertake Weekly national colors (red & white), closes May 29,
Creative Card Crew dimension, closes June 3

Saturday, May 12, 2012

My First 3D Project

This is for my Mom. I used a Silhouette cut file called card kit flower pot. I have seen lots of inspiration for these around Blogland and thought I'd give it a try. The flower pot I cut out of Kraft paper. The inside and leaves I cut out of green cardstock. Then I cut another inside out of beige, ran it through the printer to add the sentiment, and then just cut the leaves off and adhered it on top of the green. I cut some more leaves by hand from lime green cardstock. I used my Prismacolor pencils to add some color to the leaves. I used used the back of my plastic 1/32 tsp. on a soft pad to curl the leaves. Then I used Elmer's Silicone Rubber Sealant in behind. My Mom's favorite flowers are pansies, so rather than use the flowers that came with the kit cut file I used Silhouette pansy cut files in 2 different styles. I used my 1/32 tsp. again to bow the petals and silicone glue to adhere them right on top of the leaves. Some ribbon and a bow finish the pot.
My lessons learned: The silicone glue takes a long time to dry, can be messy, and has a pretty strong smell. I will try this again, but I will try using popdots, thin ones. Also, all the little black veins in the pansies were very difficult to glue on. I could have drawn them on with a black marker and saved myself some tweezer work, lol.
Wishing all Moms a very Happy Mother's Day!!!
Took advantage of some natural sunlight and a clean carpet to take my pictures today, neither one is ever a guarantee around here, but today we had both ;o)
I would like to share my card at:
Paper Sundaes Mother's Day, closes May 12,
Love to Create For Mom, closes May 13,
The Paper Variety May flowers, closes May 13,
Kaboodle Doodles Honoring Mothers, closes May 14,
Paper Pretties use ribbon, closes May 14,
The Pink Elephant Challenge all about Mom, closes May 14,
Crafting For All Seasons handmade flowers, closes May 15,
The Squirrel and The Fox one for the girls, closes May 15,
The Sisterhood of Crafters May flowers, closes May 20,
Penny's Paper-Crafty Challenge I love you Mom, closes May 23

Friday, May 11, 2012

Mother-In-Law Mother's Day

I used these 2 cutie images from The Digi Garden. They represent The Husband and his sister. I imported them into my Silhouette and used the object, arrange, and send to back button to place her arm behind him so they look as though she has her arm around him. Awwww. I used the Headline News font for the sentiment. Printed my images and sentiment onto white cardstock. Colored my images with my E11 copic and Prismacolor pencils. I paper pieced his hat, pocket and patch using red cardstock. The flower and leaves are Silhouette images. I used a button and some twinery twine for the flower center. The stitching is done by swapping my Silhouette blade for a pink glitter sketch pen. Then I made a rectangle. I changed the line style to dashed, hit cut and easy peasy stitched looking line, in pink, too cool. I will definitely use this technique again.
My lessons learned: My first attempt at coloring up my image looked like I did it on a bus. So I reprinted my image and tried again. I have got to get real markers...and real paper. My white cardstock just isn't cutting it for my digi images. Thank goodness for paper piecing. I feel so out of my league with Copics, I'm seriously considering the Tim Holtz markers. Anyone have any experience with them?
I'd like to share my card at:
My Sheri Crafts Mother's Day card with flowers, closes May 11,
Bugaboo Stamps anything goes, closes May 12,
Paper Sundaes Mother's Day, closes May 12,
Love to Create for Mom, closes May 13,
Oldie But A Goodie dies and punches, closes May 14,
Sassy Cheryl's stitching, faux or real, closes May 14,
The Squirrel and the Fox one for the girls, closes May 15,

Tuesday, May 8, 2012

From The Little Girls

I think this may be one of my favorites. This was for The Husband's birthday. I used an image from Tiddly Inks called Daddy's Girl. I imported it into my Silhouette and replicated it. Then flipped the second one horizontally and resized it smaller. I used the font Fiolex Girls and added the sentiment. I then printed both image and sentiment right out onto my card. I used Marvy Opaque Stix to add the color. I love the way they dried to an almost painted look!
My lessons learned (tip): When running your card through the printer, put the natural curve of your card up. I placed it down and it kept getting caught in the printer because it created this little bow in the paper that would not feed flat through the printer. It seemed so opposite of what I should be doing to put that curve up, but that was the only way it worked. Go figure.
I would like to share my card at:
Simon Says birthday, closes May 9,
CAS-ual Fridays clean and simple birthday, closes May 10,
Come and Get it Challenges for the boys, closes May 11,
Top Tip Tuesday clean and simple, closes May 21